2.1. Client#
2.1.1. Introduction#
We provide four ways in which you can interact with the server to manage your vantage6 resources:
The UI and the clients make it much easier to interact with the server than directly interacting with the server API through HTTP requests, especially as data is serialized and encrypted automatically. For most use cases, we recommend to use the UI and/or the Python client.
Note
The R client is only suitable for creating tasks and retrieve their results. With the Python client it is possible to use the entire API.
Note that whenever you interact with the server, you are limited by your permissions. For instance, if you try to create another user but do not have permission to do so, you will receive an error message. All permissions are described by rules, which can be aggregated in roles. Contact your server administrator if you find your permissions are inappropriate.
Note
There are predefined roles such as ‘Researcher’ and ‘Organization Admin’ that are automatically created by the server. These can be assigned to any new user by the administrator that is creating the user.
2.1.2. User Interface#
The User Interface (UI) is a web application that aims to make it easy to interact with the server. At present, it provides all functionality except for creating tasks. We aim to incorporate this functionality in the near future.
Using the UI should be relatively straightforward. There are buttons that should help you e.g. create a collaboration or delete a user. If anything is unclear, please contact us via Discord.
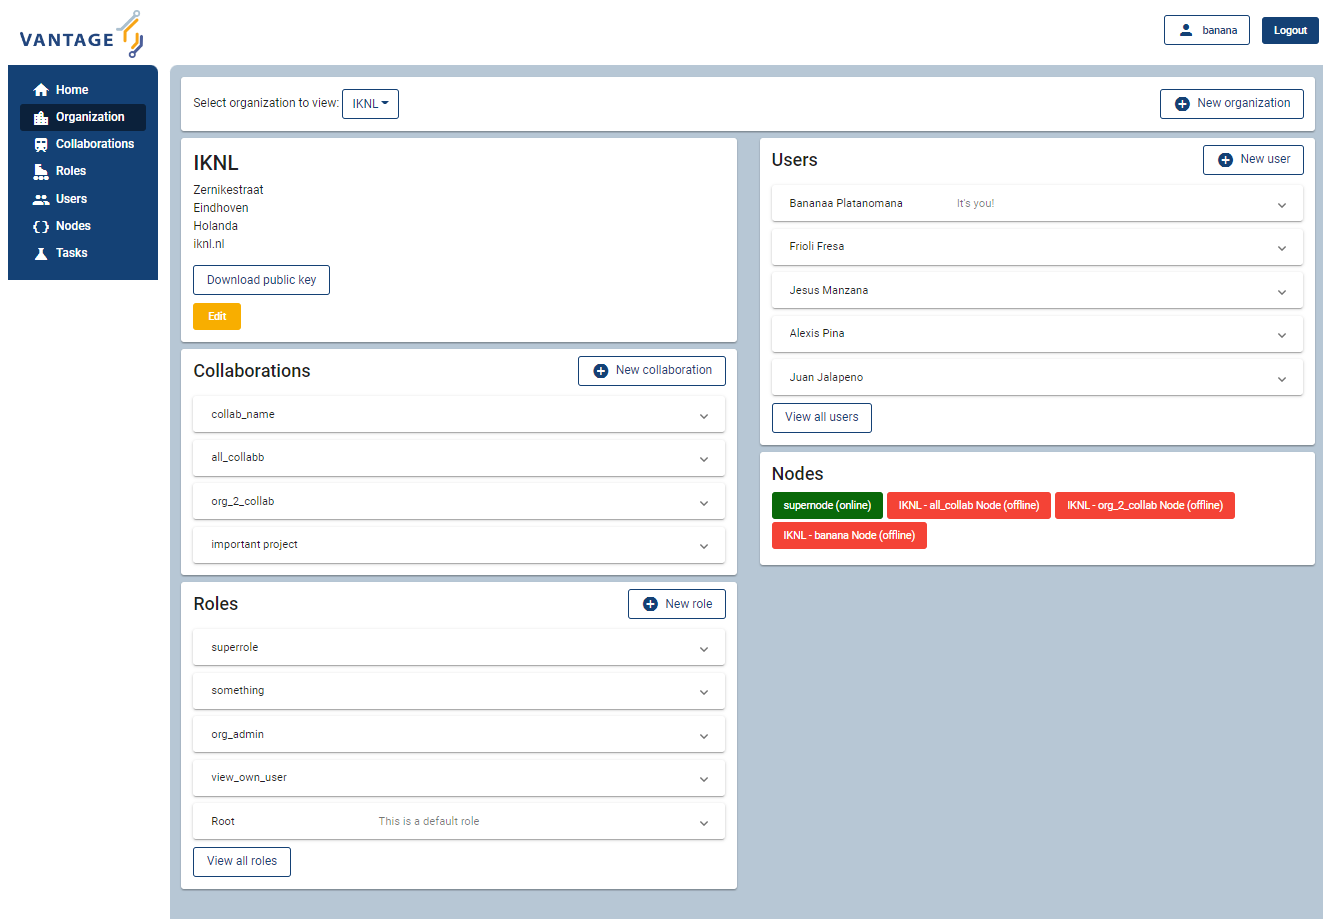
Fig. 2.1 Screenshot of the vantage6 UI#
2.1.3. Python client#
It is assumed you installed the Client. The Python client aims to completely cover the vantage6-server communication possibilities. It can create computation tasks and collect their results, manage organizations, collaborations, users, etc. The server hosts an API which the client uses for this purpose.
The methods in the library are all
documented in their docstring, you can view them using help(...) ,
e.g. help(client.user.create) will show you the parameters needed to
create a new user:
Example help function
help(client.task.create)
#Create a new task
#
#    Parameters
#    ----------
#    collaboration : int
#        Id of the collaboration to which this task belongs
#    organizations : list
#        Organization ids (within the collaboration) which need
#        to execute this task
#    name : str
#        Human readable name
#    image : str
#        Docker image name which contains the algorithm
#    description : str
#        Human readable description
#    input : dict
#        Algorithm input
#    data_format : str, optional
#        IO data format used, by default LEGACY
#    database: str, optional
#        Name of the database to use. This should match the key
#        in the node configuration files. If not specified the
#        default database will be tried.
#
#    Returns
#    -------
#    dict
#        Containing the task information
In Authentication and sections after that, there are more examples on how to use the Python client.
The following groups (related to the Components) of methods are
available, most of them have a list(), create(), delete()
and get() method attached.
client.userclient.organizationclient.ruleclient.roleclient.collaborationclient.taskclient.resultclient.utilclient.node
Authentication#
This section and the following sections introduce some minimal examples for administrative tasks that you can perform with our Python client. We start by authenticating.
To authenticate, we create a config file to store our login information.
We do this so we do not have to define the server_url,
server_port and so on every time we want to use the client.
Moreover, it enables us to separate the sensitive information (login
details, organization key) that you do not want to make publicly
available, from other parts of the code you might write later (e.g. on
submitting particular tasks) that you might want to share publicly.
# config.py

server_url = "https://MY VANTAGE6 SERVER" # e.g. https://petronas.vantage6.ai or
                                          # http://localhost for a local dev server
server_port = 443 # This is specified when you first created the server
server_api = "" # This is specified when you first created the server

username = "MY USERNAME"
password = "MY PASSWORD"

organization_key = "FILEPATH TO MY PRIVATE KEY" # This can be empty if you do not want to set up encryption
Note that the organization_key should be a filepath that points to
the private key that was generated when the organization to which your
login belongs was first created (see Creating an organization).
Then, we connect to the vantage 6 server by initializing a Client object, and authenticating
from vantage6.client import Client

# Note: we assume here the config.py you just created is in the current directory.
# If it is not, then you need to make sure it can be found on your PYTHONPATH
import config

# Initialize the client object, and run the authentication
client = Client(config.server_url, config.server_port, config.server_api,
                verbose=True)
client.authenticate(config.username, config.password)

# Optional: setup the encryption, if you have an organization_key
client.setup_encryption(config.organization_key)
Note
Above, we have added verbose=True as additional argument when creating
the Client(…) object. This will print much more information that can be
used to debug the issue.
Creating an organization#
After you have authenticated, you can start generating resources. The following also assumes that you have a login on the Vantage6 server that has the permissions to create a new organization. Regular end-users typically do not have these permissions (typically only administrators do); they may skip this part.
The first (optional, but recommended) step is to create an RSA keypair. A keypair, consisting of a private and a public key, can be used to encrypt data transfers. Users from the organization you are about to create will only be able to use encryption if such a keypair has been set up and if they have access to the private key.
from vantage6.common import warning, error, info, debug, bytes_to_base64s
from vantage6.client.encryption import RSACryptor
from pathlib import Path

# Generated a new private key
# Note that the file below doesn't exist yet: you will create it
private_key_filepath = r'/path/to/private/key'
private_key = RSACryptor.create_new_rsa_key(Path(private_key_filepath))

# Generate the public key based on the private one
public_key_bytes = RSACryptor.create_public_key_bytes(private_key)
public_key = bytes_to_base64s(public_key_bytes)
Now, we can create an organization
client.organization.create(
    name = 'The_Shire',
    address1 = '501 Buckland Road',
    address2 = 'Matamata',
    zipcode = '3472',
    country = 'New Zealand',
    domain = 'the_shire.org',
    public_key = public_key   # use None if you haven't set up encryption
)
Users can now be created for this organization. Any users that are created and who have access to the private key we generated above can now use encryption by running
client.setup_encryption('/path/to/private/key')

# or, if you don't use encryption
client.setup_encryption(None)
after they authenticate.
Creating a collaboration#
Here, we assume that you have a Python session with an authenticated Client object, as created in Authentication. We also assume that you have a login on the Vantage6 server that has the permissions to create a new collaboration (regular end-users typically do not have these permissions, this is typically only for administrators).
A collaboration is an association of multiple organizations that want to run analyses together. First, you will need to find the organization id’s of the organizations you want to be part of the collaboration.
client.organization.list(fields=['id', 'name'])
Once you know the id’s of the organizations you want in the collaboration (e.g. 1 and 2), you can create the collaboration:
collaboration_name = "fictional_collab"
organization_ids = [1,2] # the id's of the respective organizations
client.collaboration.create(name = collaboration_name,
                            organizations = organization_ids,
                            encrypted = True)
Note that a collaboration can require participating organizations to use
encryption, by passing the encrypted = True argument (as we did
above) when creating the collaboration. It is recommended to do so, but
requires that a keypair was created when Creating an organization
and that each user of that
organization has access to the private key so that they can run the
client.setup_encryption(...) command after
Authentication.
Registering a node#
Here, we again assume that you have a Python session with an authenticated Client object, as created in Authentication, and that you have a login that has the permissions to create a new node (regular end-users typically do not have these permissions, this is typically only for administrators).
A node is associated with both a collaboration and an organization (see Components). You will need to find the collaboration and organization id’s for the node you want to register:
client.organization.list(fields=['id', 'name'])
client.collaboration.list(fields=['id', 'name'])
Then, we register a node with the desired organization and collaboration. In this example, we create a node for the organization with id 1 and collaboration with id 1.
# A node is associated with both a collaboration and an organization
organization_id = 1
collaboration_id = 1
api_key = client.node.create(collaboration = collaboration_id, organization = organization_id)
print(f"Registered a node for collaboration with id {collaboration_id}, organization with id {organization_id}. The API key that was generated for this node was {api_key}")
Remember to save the api_key that is returned here, since you will
need it when you Configure the node.
Creating a task#
Preliminaries
Here we assume that
you have a Python session with an authenticated Client object, as created in Authentication.
you already have the algorithm you want to run available as a container in a docker registry (see here for more details on developing your own algorithm)
the nodes are configured to look at the right database
In this manual, we’ll use the averaging algorithm from
harbor2.vantage6.ai/demo/average, so the second requirement is met.
This container assumes a comma-separated (*.csv) file as input, and will
compute the average over one of the named columns. We’ll assume the
nodes in your collaboration have been configured to look at a
comma-separated database, i.e. their config contains something like
databases:
    default: /path/to/my/example.csv
    my_other_database: /path/to/my/example2.csv
so that the third requirement is also met. As an end-user running the algorithm, you’ll need to align with the node owner about which database name is used for the database you are interested in. For more details, see how to Configure your node.
Determining which collaboration / organizations to create a task for
First, you’ll want to determine which collaboration to submit this task to, and which organizations from this collaboration you want to be involved in the analysis
>>> client.collaboration.list(fields=['id', 'name', 'organizations'])
[
 {'id': 1, 'name': 'example_collab1',
 'organizations': [
     {'id': 2, 'link': '/api/organization/2', 'methods': ['GET', 'PATCH']},
     {'id': 3, 'link': '/api/organization/3', 'methods': ['GET', 'PATCH']},
     {'id': 4, 'link': '/api/organization/4', 'methods': ['GET', 'PATCH']}
 ]}
]
In this example, we see that the collaboration called example_collab1
has three organizations associated with it, of which the organization
id’s are 2, 3 and 4. To figure out the names of these
organizations, we run:
>>> client.organization.list(fields=['id', 'name'])
[{'id': 1, 'name': 'root'}, {'id': 2, 'name': 'example_org1'},
 {'id': 3, 'name': 'example_org2'}, {'id': 4, 'name': 'example_org3'}]
i.e. this collaboration consists of the organizations example_org1
(with id 2), example_org2 (with id 3) and example_org3
(with id 4).
Creating a task that runs the master algorithm
Now, we have two options: create a task that will run the master
algorithm (which runs on one node and may spawns subtasks on other nodes),
or create a task that will (only) run the RPC methods (which are run
on each node). Typically, the RPC methods only run the node local analysis
(e.g. compute the averages per node), whereas the master algorithms
performs aggregation of those results as well (e.g. starts the node
local analyses and then also computes the overall average). First, let
us create a task that runs the master algorithm of the
harbor2.vantage6.ai/demo/average container
input_ = {'method': 'master',
          'kwargs': {'column_name': 'age'},
          'master': True}

average_task = client.task.create(collaboration=1,
                                  organizations=[2,3],
                                  name="an-awesome-task",
                                  image="harbor2.vantage6.ai/demo/average",
                                  description='',
                                  input=input_,
                                  data_format='json')
Note that the kwargs we specified in the input_ are specific to
this algorithm: this algorithm expects an argument column_name to be
defined, and will compute the average over the column with that name.
Furthermore, note that here we created a task for collaboration with id
1 (i.e. our example_collab1) and the organizations with id 2
and 3 (i.e. example_org1 and example_org2). I.e. the
algorithm need not necessarily be run on all the organizations
involved in the collaboration. Finally, note that
client.task.create() has an optional argument called database.
Suppose that we would have wanted to run this analysis on the database
called my_other_database instead of the default database, we
could have specified an additional database = 'my_other_database'
argument. Check help(client.task.create) for more information.
Creating a task that runs the RPC algorithm
You might be interested to know output of the RPC algorithm (in this example: the averages for the ‘age’ column for each node). In that case, you can run only the RPC algorithm, omitting the aggregation that the master algorithm will normally do:
input_ = {'method': 'average_partial',
          'kwargs': {'column_name': 'age'},
          'master': False}

average_task = client.task.create(collaboration=1,
                                  organizations=[2,3],
                                  name="an-awesome-task",
                                  image="harbor2.vantage6.ai/demo/average",
                                  description='',
                                  input=input_,
                                  data_format='json')
Inspecting the results
Of course, it will take a little while to run your algorithm. You can use the following code snippet to run a loop that checks the server every 3 seconds to see if the task has been completed:
print("Waiting for results")
task_id = average_task['id']
task_info = client.task.get(task_id)
while not task_info.get("complete"):
    task_info = client.task.get(task_id, include_results=True)
    print("Waiting for results")
    time.sleep(3)

print("Results are ready!")
When the results are in, you can get the result_id from the task object:
result_id = task_info['id']
and then retrieve the results
result_info = client.result.list(task=result_id)
The number of results may be different depending on what you run, but for the master algorithm in this example, we can retrieve it using:
>>> result_info['data'][0]['result']
{'average': 53.25}
while for the RPC algorithm, dispatched to two nodes, we can retrieve it using
>>> result_info['data'][0]['result']
{'sum': 253, 'count': 4}
>>> result_info['data'][1]['result']
{'sum': 173, 'count': 4}
2.1.4. R Client#
It is assumed you installed the R client library. The R client can create tasks and retrieve their results. If you want to do more administrative tasks, either use the API directly or use the Python client.
Initialization of the R client can be done by:
setup.client <- function() {
  # Username/password should be provided by the administrator of
  # the server.
  username <- "username@example.com"
  password <- "password"

  host <- 'https://petronas.vantage6.ai:443'
  api_path <- ''

  # Create the client & authenticate
  client <- vtg::Client$new(host, api_path=api_path)
  client$authenticate(username, password)

  return(client)
}

# Create a client
client <- setup.client()
Then this client can be used for the different algorithms. Refer to the README in the repository on how to call the algorithm. Usually this includes installing some additional client-side packages for the specific algorithm you are using.
Warning
The R client is subject to change. We aim to make it more similar to the Python client.
Example#
This example shows how to run the vantage6 implementation of a federated Cox Proportional Hazard regression model. First you need to install the client side of the algorithm by:
devtools::install_github('iknl/vtg.coxph', subdir="src")
This is the code to run the coxph:
print( client$getCollaborations() )

# Should output something like this:
#   id     name
# 1  1 ZEPPELIN
# 2  2 PIPELINE

# Select a collaboration
client$setCollaborationId(1)

# Define explanatory variables, time column and censor column
expl_vars <- c("Age","Race2","Race3","Mar2","Mar3","Mar4","Mar5","Mar9",
               "Hist8520","hist8522","hist8480","hist8501","hist8201",
               "hist8211","grade","ts","nne","npn","er2","er4")
time_col <- "Time"
censor_col <- "Censor"

# vtg.coxph contains the function `dcoxph`.
result <- vtg.coxph::dcoxph(client, expl_vars, time_col, censor_col)
2.1.5. Server API#
The server API is documented in the path https://SERVER[/api_path]/apidocs.
For Petronas, the API docs can thus be found at
https://petronas.vantage6.ai/apidocs.
This page will show you which API endpoints exist and how you can use them. All endpoints communicate via HTTP requests, so you can communicate with them using any platform or programming language that supports HTTP requests.